How to Install a Double DIN Head Unit
The full step-by-step: battery, panel removal, bench pre-wiring, grounding, testing, and reassembly, with the steps that actually go wrong.
We earn a commission if you buy through links on this page. How this site makes money.
The short answer
Installing a double-DIN head unit means, in order: disconnecting the battery, removing the factory dash trim and radio, pre-wiring the new harness on a bench, grounding the unit properly, testing it with the panels still off, and only then reassembling the dash. Skip the pre-wiring step and a straightforward install can eat four hours; do it on the bench first and the same job is often done in 90 minutes. None of this requires cutting the factory harness on a vehicle with the correct dash kit and harness adapter.
What you need before you start
Confirm your dash kit and wiring harness adapter are the correct part numbers for your specific year, make, model and trim — not just the model name. A kit for a 2014-2018 Silverado does not fit a 2019-2024 Silverado, and a kit built for a Civic EX does not fit a Civic LX. See Dash Kits Explained and Wiring Harness Basics for what these parts actually do and how to identify the right one for your car.
Lay out a basic tool kit before you touch the dash: a panel-removal tool set (plastic, not metal, to avoid scarring factory trim), a Phillips and flat screwdriver, a small socket set, wire strippers and crimpers, heat-shrink butt connectors, and a multimeter set to DC voltage. The multimeter is not optional — it’s the only reliable way to confirm a wire is actually switched power before you trust a color code.
1. Disconnect the battery
Disconnect the negative battery terminal before you remove a single panel. This isn’t caution for its own sake: with the battery live, a stray wire or tool touching the wrong two contacts at once can short a circuit, blow a fuse buried somewhere inconvenient, or trip a fault code in an unrelated system sharing the same electrical bus. It also means the vehicle can’t power anything unexpectedly — including, on some vehicles, an airbag system with its own capacitor-backed reserve — while your hands and tools are in the dash. Wait a few minutes after disconnecting before you start prying panels, to let any capacitor-backed circuits bleed down.
2. Remove the trim panels and factory radio
This is where people actually get hurt or break something, more than any other step in the job. Factory dash clips are plastic, and they get more brittle with age and sun exposure. Work slowly, use a plastic panel tool rather than a screwdriver, and find the actual clip points before you start prying — pulling in the wrong spot, or pulling straight out instead of at the angle the clip releases, is how bezels crack.
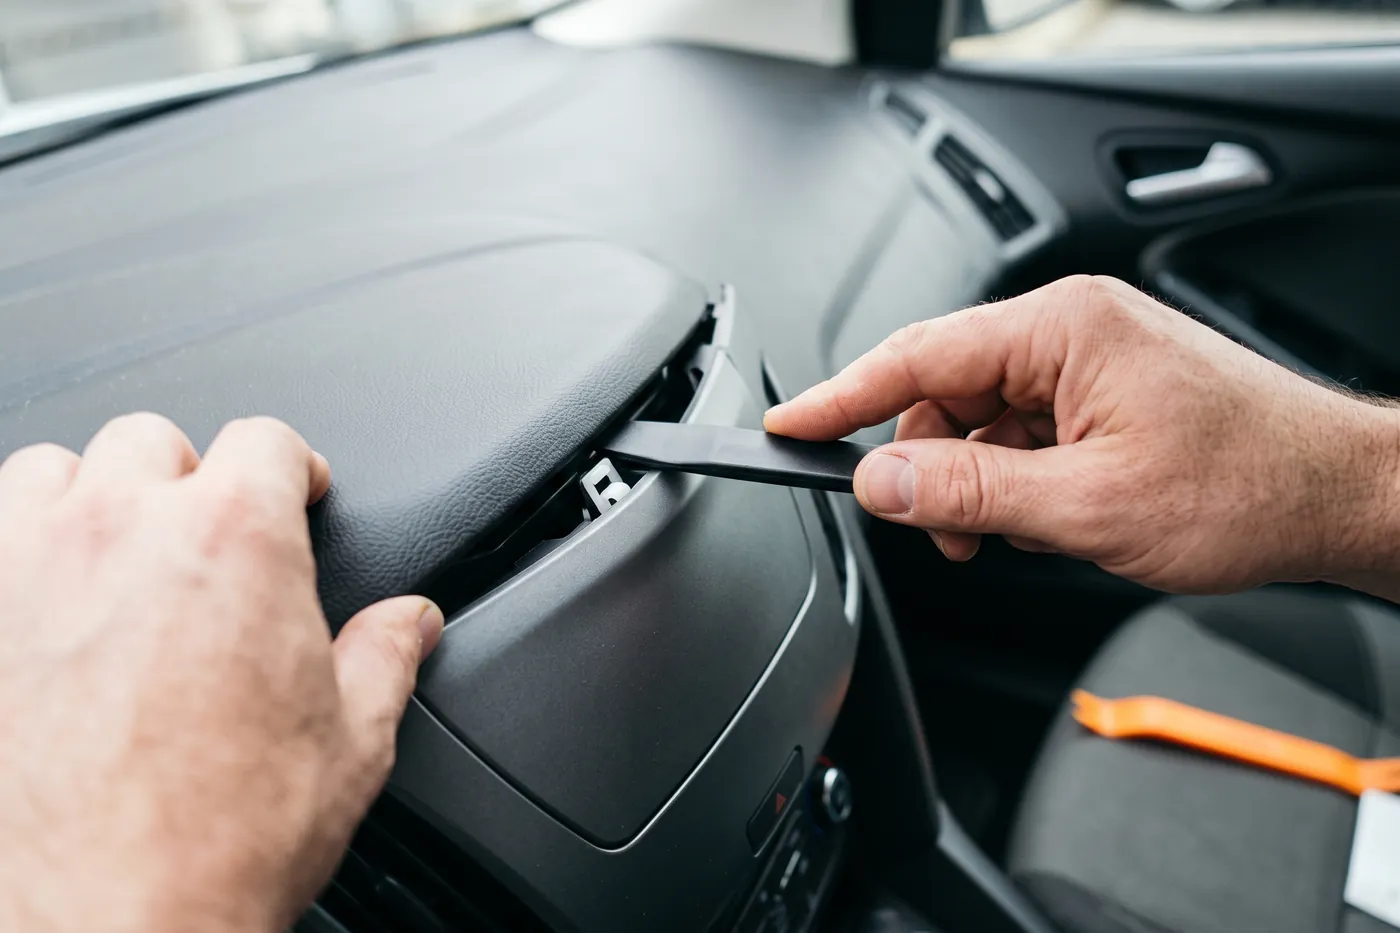
Set aside every screw and bolt in the order you remove them; factory radio mounting bolts are often a different size from the trim screws around them, and mixing them up creates problems at reassembly. Once the factory radio is free, disconnect its harness, antenna lead, and (if equipped) camera and amplifier connectors, and set the factory unit aside somewhere safe — a full-featured factory unit with navigation or a premium sound system may be worth reselling separately.
3. Pre-wire the harness on the bench
This is the step that turns a four-hour first-timer install into a 90-minute one. Instead of connecting the vehicle-specific harness adapter to the new head unit’s own wiring pigtail with your arm jammed inside the dash opening, do it on a bench or your lap, in good light, where you can see every splice and every color match clearly.
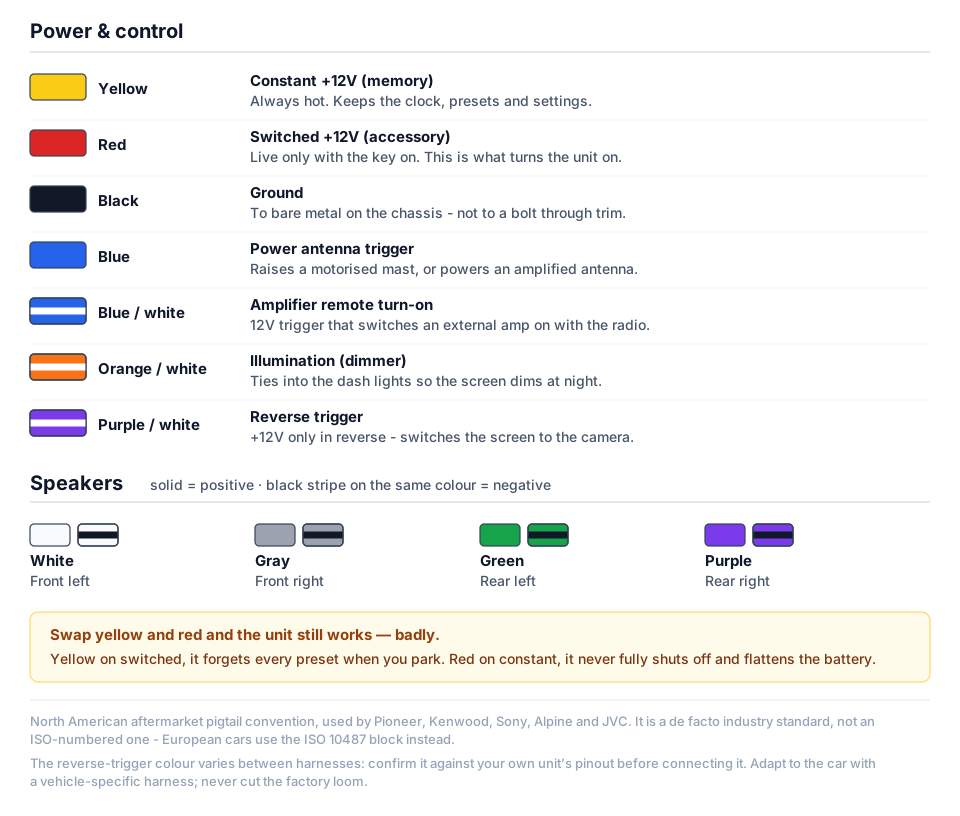
Match the aftermarket radio’s pigtail wires to the harness adapter’s wires by function, not by hoping the colors line up exactly — the aftermarket convention (yellow for constant 12V, red for switched 12V, black for ground, blue for antenna trigger, blue/white for amp remote turn-on, orange/white for illumination) is widely used across major brands but is a convention, not a guarantee for every product. Crimp each connection with a heat-shrink butt connector rather than a twist-and-tape job or a quick-splice tap; quick-splice (“T-tap”) connectors are a known weak point for corrosion and intermittent connections that tend to show up as a problem months later, not on install day. Speaker wires follow their own pairing (white = front left, gray = front right, green = rear left, purple = rear right, with a black stripe marking the negative lead of each pair) — get these right now, because a reversed pair is much easier to fix on the bench than after the unit is bolted in.
If your vehicle needs a steering wheel control interface, factory amplifier integration, or a camera retention adapter, this is also the point to wire those modules in — see Keeping Your Steering Wheel Controls, Working With a Factory Amplifier, and Backup Camera Wiring for what each of those actually involves before you start.
4. Ground the unit properly
A solid, low-resistance ground connection is not a detail — a poor ground is one of the most common sources of a head unit that reboots randomly, a camera that cuts out intermittently, or persistent electrical noise in the audio. Connect the ground wire to a factory ground point or bare metal chassis point, not to a painted surface or a thin trim bracket; paint acts as an insulator, and a bracket that flexes can work a connection loose over time. If you’re adding a separate ground for an accessory like a camera or amplifier, keep it short and attach it to metal, not to another wire’s splice point.
5. Test before you reassemble
With the dash panels still off and the harness connected but nothing bolted down, reconnect the battery and power the unit on. Confirm the radio powers up and shuts off correctly with the ignition, that speakers play in the correct positions, that illumination dims with the dash lights, and that any steering wheel controls, camera, or amplifier integration you wired in the previous step actually works. This is the point where a wiring mistake costs you five minutes to fix. Found after the dash is fully reassembled, the same mistake costs you the whole job over again — pulling panels you just carefully reinstalled.
6. Reassemble
Once everything tests correctly, disconnect the battery again before you do the final mounting — you’re about to be working near bare connectors as you seat the unit into the dash kit brackets, and the same short-circuit risk from step one applies here too. Mount the head unit into the dash kit’s bracket, route and secure the harness with zip ties so nothing rattles or pinches behind the dash, and snap the trim facade on last. Reconnect the battery, power the unit on one more time to confirm nothing shifted during reassembly, and refit any panels you removed for access, working the clips back in the reverse order you took them out.
What to check afterward
Drive it, and pay attention to anything that only shows up in motion: a rattle from a loose harness, a dropout in reverse-camera display, or a steering wheel button that stopped responding. These are far more often a loose connector or an unsecured harness than a defective radio, and they’re easiest to fix while you still remember exactly how everything was routed. If your vehicle has a factory-amplified sound system or a digital steering wheel control bus, and you skipped those steps because you weren’t sure what your car needed, go back and check — Working With a Factory Amplifier and Keeping Your Steering Wheel Controls cover how to tell before you’re stuck with dead controls or a factory amp fighting the new radio.
Frequently asked questions
Do I really need to disconnect the battery?
Yes. It removes constant power from the vehicle's wiring before you're touching bare connectors near it, and it prevents an accidental short from blowing a fuse, tripping an airbag fault code, or damaging the new unit's electronics the moment a wire touches the wrong pin.
What's the single step most likely to cause damage?
Panel removal, by a wide margin. Factory dash and trim clips are plastic, they're old, and prying in the wrong spot or at the wrong angle is how bezels crack and clips snap — not the wiring, which is far more forgiving of a slow, careful approach.
Can I skip pre-wiring the harness on the bench?
You can, but it's the single biggest time cost in a first-timer install. Doing the harness-to-harness connections at a workbench, in good light, before anything is bolted into the dash, is what separates a 90-minute install from a 4-hour one spent working blind with your arm in the dash.
Why test before buttoning everything back up?
Because finding a wiring mistake after the dash is fully reassembled means taking it all apart again. A five-minute test with the panels still off costs you five minutes; the same mistake found after reassembly costs you the whole job over again.
Do I need a dash kit and harness adapter for every vehicle?
Almost always, yes. Aftermarket radios use a standardized wire-color convention that doesn't match any vehicle's factory wiring, so a vehicle-specific harness adapter translates between the two without cutting the factory harness. A dash kit does the same job cosmetically and structurally — see [Wiring Harness Basics](/guides/wiring-harness-basics/) and [Dash Kits Explained](/guides/dash-kits-explained/).
Check what fits your car
Every unit above still has to physically fit your dash. These pages list what actually bolts into these vehicles, plus the dash kit, harness and adapters each swap needs: